

How To Set Up Java On Windows 10
Introduction
The Java Development Kit (JDK) is software used for Java programming, forth with the Coffee Virtual Machine (JVM) and the Coffee Runtime Environment (JRE). The JDK includes the compiler and form libraries, assuasive developers to create Coffee programs executable by the JVM and JRE.
In this tutorial, you will acquire to install the Java Evolution Kit on Windows.
Prerequisites
- A system running Windows 10.
- A network connectedness.
- Administrator privileges.
Annotation: Develop your cadre app services on PNAP's Blank Metallic Deject servers to ensure superior performance. It's cloud native and the perfect environment for the entire SDLC.
Check if Java Is Installed
Earlier installing the Java Evolution Kit, check if a Coffee version is already installed on Windows. Follow the steps below:
- Open a command prompt by typing cmd in the search bar and press Enter.
- Run the post-obit command:
java -version 
The command outputs the Java version on your system. If Java isn't installed, the output is a bulletin stating that Coffee isn't recognized as an internal or external command.
Download Coffee for Windows 10
Download the latest Java Evolution Kit installation file for Windows 10 to have the latest features and bug fixes.
- Using your preferred web browser, navigate to the Oracle Java Downloads page.
- On the Downloads folio, click the x64 Installer download link under the Windows category. At the time of writing this article, Coffee version 17 is the latest long-term support Java version.
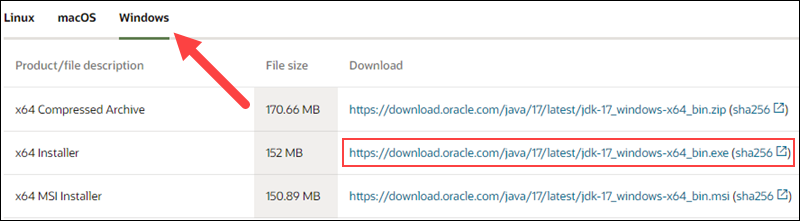
Wait for the download to complete.
Install Java on Windows ten
After downloading the installation file, proceed with installing Java on your Windows arrangement.
Follow the steps below:
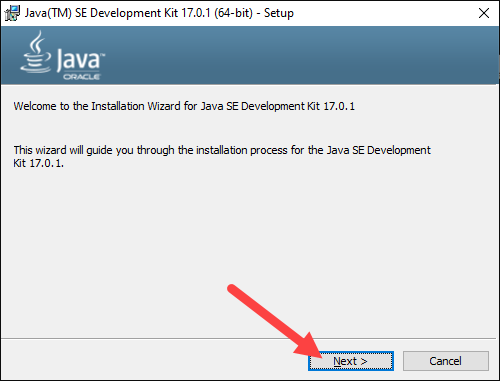
Step 1: Run the Downloaded File
Double-click the downloaded file to beginning the installation.
Footstep two: Configure the Installation Wizard
After running the installation file, the installation wizard welcome screen appears.
1. Click Adjacent to go on to the next step.
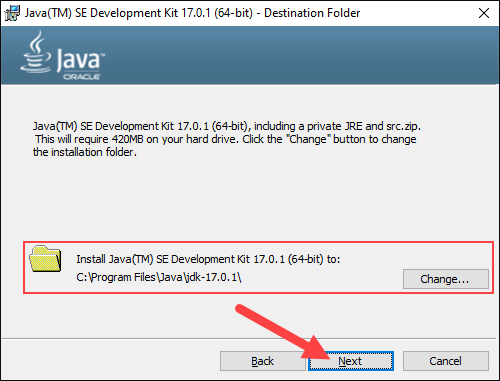
two. Choose the destination binder for the Coffee installation files or stick to the default path. Click Side by side to proceed.
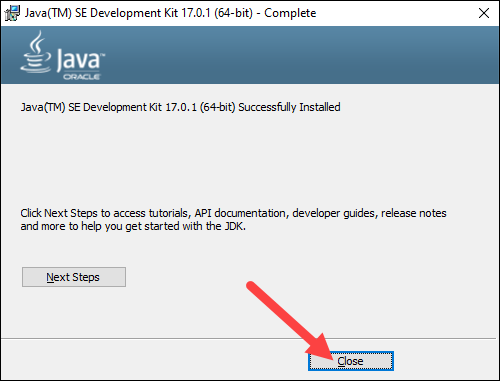
3. Await for the wizard to stop the installation process until the Successfully Installed message appears. Click Shut to exit the wizard.
Set Environmental Variables in Java
Fix Coffee surroundings variables to enable program compiling from any directory. To do so, follow the steps beneath:
Step i: Add Java to System Variables
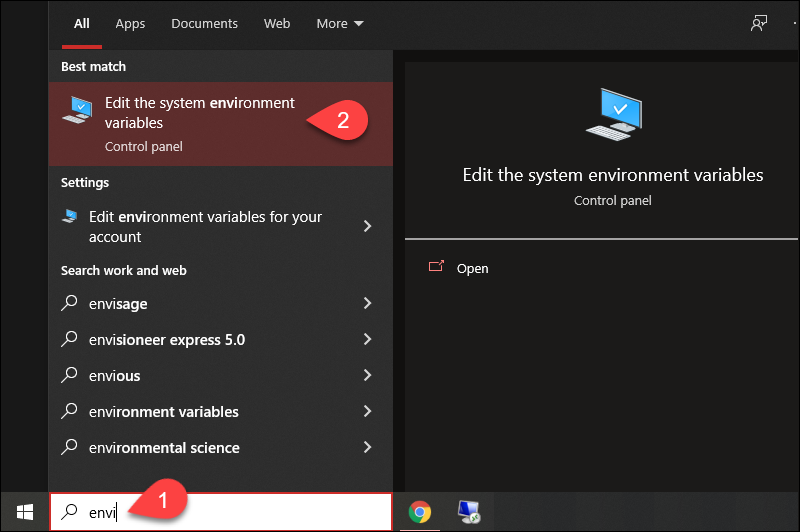
1. Open the Start menu and search for environment variables.
2. Select the Edit the arrangement surroundings variables consequence.
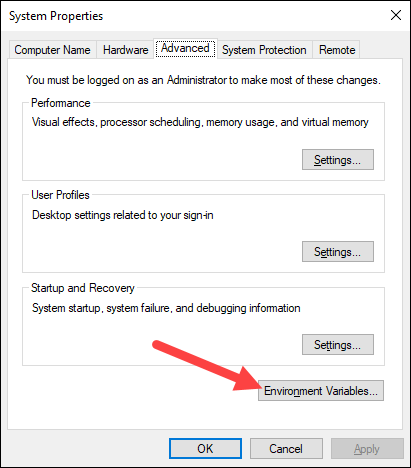
3. In the System Properties window, under the Advanced tab, click Environment Variables…
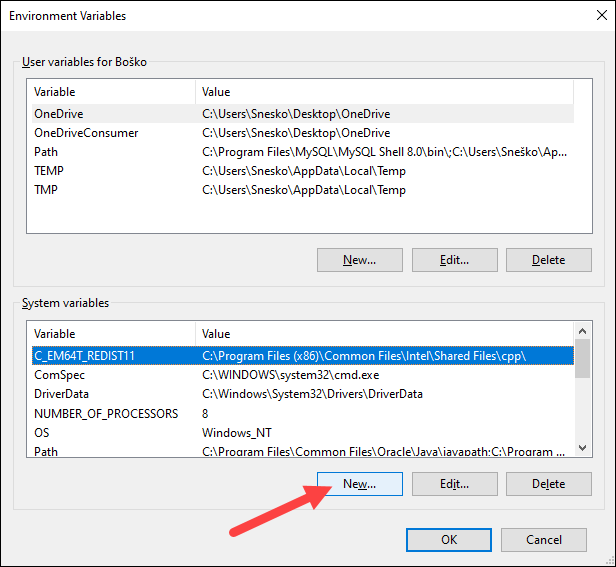
4. Nether the System variables category, select the Path variable and click Edit:

v. Click the New push button and enter the path to the Coffee bin directory:
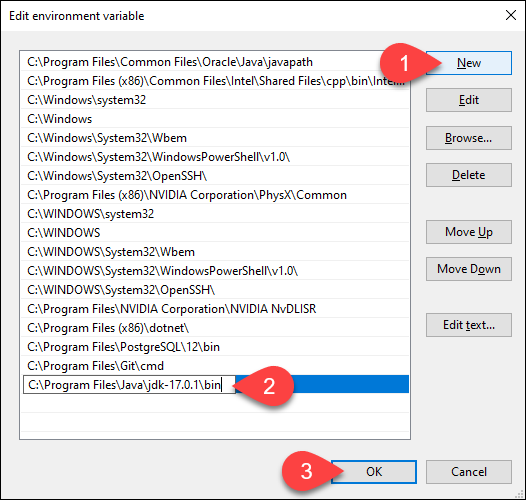
Notation: The default path is usually C:\Program Files\Java\jdk-17.0.1\bin.
6. Click OK to save the changes and get out the variable editing window.
Stride two: Add JAVA_HOME Variable
Some applications require the JAVA_HOME variable. Follow the steps below to create the variable:
1. In the Environment Variables window, under the System variables category, click the New… button to create a new variable.
2. Name the variable equally JAVA_HOME .
iii. In the variable value field, paste the path to your Java jdk directory and click OK.
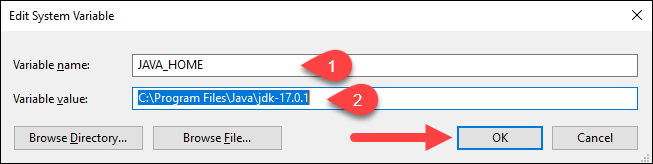
4. Ostend the changes by clicking OK in the Environment Variables and System properties windows.
Test the Java Installation
Run the java -version control in the control prompt to make certain Coffee installed correctly:

If installed correctly, the command outputs the Java version. Brand sure everything works past writing a unproblematic programme and compiling it. Follow the steps below:
Step 1: Write a Examination Java Script
1. Open a text editor such as Notepad++ and create a new file.
two. Enter the following lines of lawmaking and click Save:
class HelloWorld{ public static void main(String args[]){ System.out.println("Hi world!"); } } 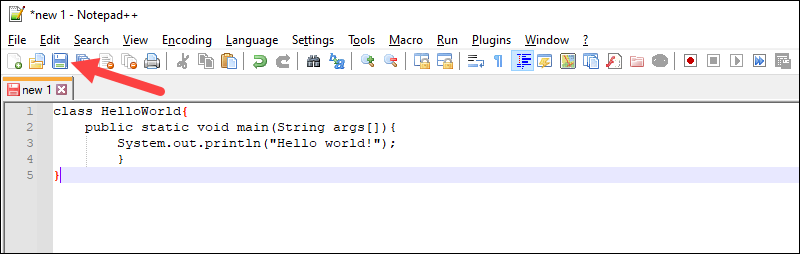
three. Proper name the file and save it as a Java source file (*.coffee).
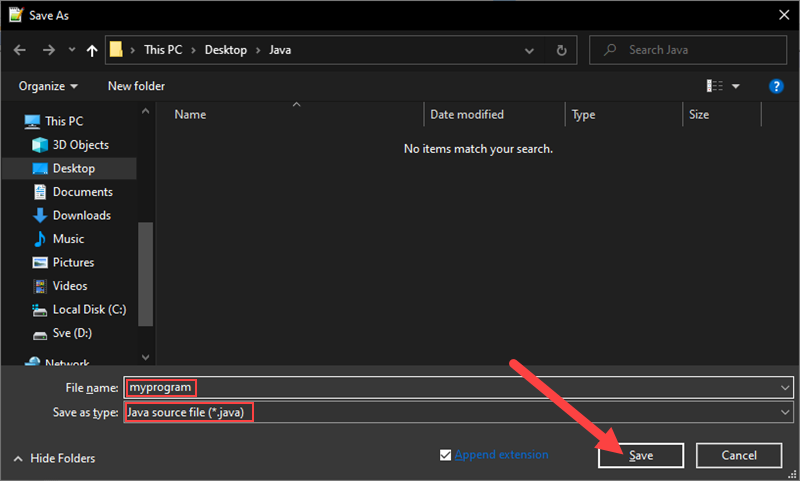
Note: When using Notepad, select All files for the Salvage as type pick and add the .java extension to the file name.
Footstep 2: Compile the Test Java Script
1. In the command prompt, change the directory to the file's location and use the following syntax to compile the program:
javac [filename] For case:

After a successful compilation, the program generates a .grade file in the file directory.
ii. Run the program with the post-obit syntax:
coffee [filename] 
The output shows that the program runs correctly, displaying the How-do-you-do earth! message.
Conclusion
This tutorial showed how to install the Java Evolution Kit on a Windows organization. If you are interested in learning more than nigh Java, read our list of thirteen best Coffee IDEs for writing, debugging, and testing Coffee code.
Was this article helpful?
Aye No

How To Set Up Java On Windows 10,
Source: https://phoenixnap.com/kb/install-java-windows
Posted by: lattimoremanderjusto46.blogspot.com
0 Response to "How To Set Up Java On Windows 10"
Post a Comment